Assignments
Project: Blog Template
Due 5/14
Blog Template
The final deliverable for this project is the demo website itself. It should have a minimum of four pages:
- home page
- blog index page
- blog posting page
- style guide
Your final file structure should look like this
blog-template
      +
      |
      +--> index.html
      |
      +--> style-guide.html
      |
      +--> blog-research.pdf
      |
      +--> [ the rest of your files ]
Your site should include the following components in your style guide and somewhere in your pages:
- header
- navigation
- search function
- buttons (two types, minimum)
- author bio box
- posting list (recent, popular, etc...)
- subscribe form
- social media link
- comments list
- footer with contact info
- favicon
Optional components:
- media gallery
- pagination
- slide show
- categories & tags
- ad placement
- calendar
- modals/overlays
- filters
- tables
- pricing
- tabbed content
Be sure to include a link to your style guide in the template's navigation.
Save your work into your project folder on the server. Be sure to name the home page index.html.
Project: Blog Template
Due 11/12
Blog Research: Interface Inventory
Before you begin to design your blog template, you need to become familiar with all the components that commonly make up a blog-based website. For this research document you will select a blog template to analyze and inventory its contents. Take screenshots of the template in both desktop and mobile views. In Illustrator or Photoshop, identify all of the different components on the page, like in this example. Save the file as a pdf named blog-research.pdf.
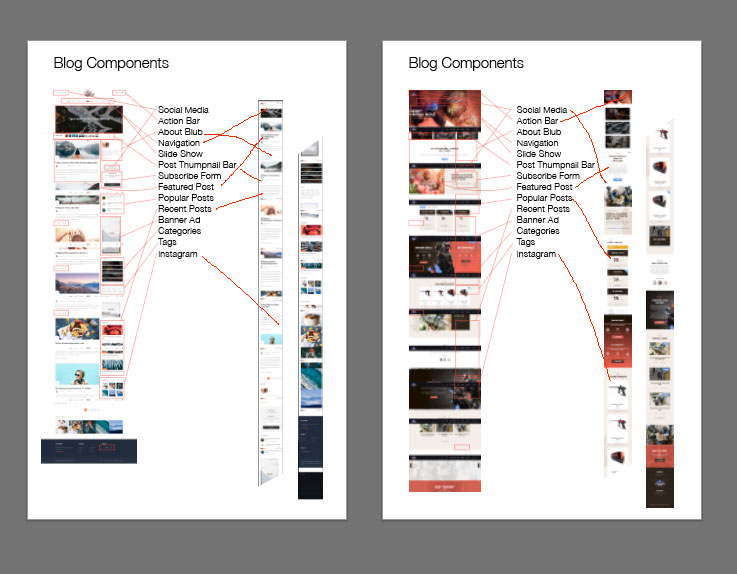
Create a folder named blog-template. This will be your main folder for this blog design project. Place the pdf in the project folder and upload it to the server.
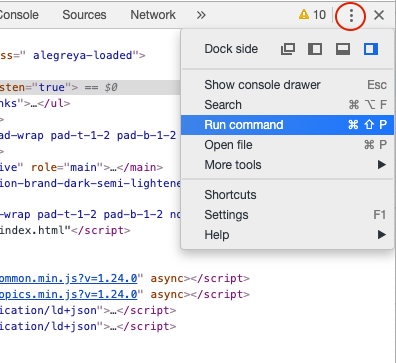
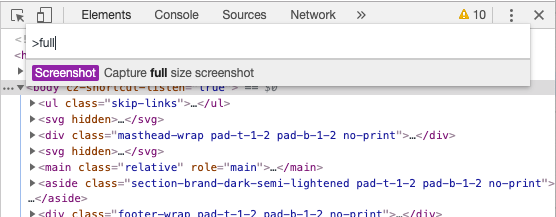
How to make a full-page screenshot (in Chrome)
Open the developer tools and click the three dots in the upper right corner. From the drop-down, choose "Run command."
Type "full" into the command line field. The option to capture a full-page screenshot should appear. Click it. Do this for both the desktop and mobile sizes.
Project: Donation Form
Due 11/7
Project: Donation Form
Phase 1: Wireframe Prototype and Testing
The purpose of wireframing is to present the design concept and the basic function of the product to your clients.
Using Adobe XD, create an interactive wireframe prototype that simulates the user experience of your donation form. You will be testing this prototype on volunteer testers, so make sure you are thorough, although it is fine to test certain specific portions of the process before you have finished the entire prototype.
You might want to watch the Lynda playlist about wireframing in Adobe XD. If you need more instruction, search for other resources or watch more videos from that same Lynda course.
Before you begin testing...
...be sure to watch this Lynda playlist about usability testing. Also, I need to approve the three tasks you will be asking the user to do. Be sure to use some sort of script during the testing. Here is an example moderator script.
Phase 2: Building the Web Form
This is the part where you create a "functional" HTML web form based on your prototype, including any revisions that resulted from the user testing. By "functional," I mean that all of input elements should be interactive and that the flow of the screens is accurate. It does not need to function in terms of any behaviors that would require Javascript (such as communicating with a database, or inline error detection). Some of these things you will need to simulate creatively. Watch this Lynda playlist on creating forms in HTML.
Save the final donation site in a folder named donation and upload it to the server.
For your usability testing, make an HTML page with your notes and your wireframe embedded. Don't forget to include your name and a heading. Name the file usability.html and save it into your project folder.
# 4
Due 10/24
Usability: Article + Quiz
Read this article about website forms usability. Then take this quiz.
# 3
Due 10/1
Videos: CSS Animations
Watch the first seven videos from this playlist. Experiment with the code and be prepared to jump into CSS animations in class on Tuesday.
Project: Timeline Website
Due 1/17
Timeline Website
A timeline website is one that presents information on a topic, divided into sections, in a linear order. This assignment focuses on...
- presenting a lot of information in an organized, digestible way on one page
- writing accsessible, semantic code
- responsive design
- adding animations to enhance the user's experience
Timeline websites are often scrolling websites, but can also be slide-based, or even scroll horizontally instead of vertically. The topic is up to you and does not necessarily have to involve the passage of time. The information could be sectioned off according to some other quality. For example, a sports website could focus on a series of great players.
Here are a few examples...
Lois JeansThe Anne Frank House
Computing History
Orange History
Canal Plus Allstar History
The Work
Minimal Monkey
Gramercy Park Hotel
Step 1
Design a mockup of both the desktop and mobile versions of your site and upload the images here. Your mockups will probably be very long and rectangular, either vertically or horizontally, in order to represent all of the content. Due 10/3
Step 2
Build the site. Name your project folder timeline and upload it to the server.
Project: CSS Zen Garden
Due 9/24
CSS Zen Garden
CSS Zen Garden is an online project challenging designers to harness the power of CSS. Using the same HTML file, numerous layouts have been created by many designers using only CSS — each one distinct from rest.
Step 1
Design a mockup of your layout and upload a screenshot here. Due 9/5.
Step 2
Download the HTML file, link it to your own stylesheet, and get started. The only part of the HTML file you are allowed to edit is the <link> tag to your
stylesheet. Do not add any elements, classes, id's, etc.
Use this as chance to become more familiar with CSS grid, flexbox, and combinator selectors. There are links to helpful resources on the schedule page.
Final Responsive Layout
This assignment is meant to be an introduction to responsive design. You will be creating an alternate set of styles to adjust your design so that it looks and functions better on a mobile phone.
Start with the CSS Zen Garden layout you already have. Open in a browser with the developer tools turned on, switch the viewing mode to mobile (here's a how-to article for all the browsers). Notice what parts of the layout and design are causing problems, or are not as effective. These are the things you will override with new styles.
Your final design should contain the following components
- a layout that breaks with the normal document flow, using CSS grid
- responsive adjustments to the layout and design using media queries (aka mobile styles)
- customized typography using web fonts and careful typesetting
- use the
background-imageproperty to add graphic elements to the design - attention to content (does the organization of the page make sense)
- styled hover states on links
For help with responsive design concepts and code, watch this Lynda playlist.
Save your project in a folder called csszengarden and upload it into your GD150 directory on the server.
# 2
Due 1/24
Specificity and Complex Selectors
1. Watch these videos:
2. Refer to this article: Complex Selectors by Shay Howe
# 1
Due 8/27
Webpage: Summer Break
Create a webpage about your summer break. This could be anything at all — a trip, shoes you bought, a list of movies you watched, maybe the fantasy vacation you wish you'd taken. The point of this assignment is simply to wake up your brain and refresh what you remember about writing html and css. Start with the basics of simply creating a blank html file. Then add a header or some body copy. See if you can add a photo. Refresh your memory on how to use a google font. Ideally you would have a minimum of some text (using a web font), an image, and some css styles. However, the most important thing is that you go at your own pace and do what you are comfortable with.
I don't care how messy your code is. I won't be looking at it. Just make something and bring it to class.
Do not do this assignment in copdepen.
Don't know where to start?
Maybe one of my youtube videos would help. Or maybe the interactive tutorials at codecademy.com.