Assignments
WEBSITE REDESIGN
Due Finals Week
The Final Website
Your final website should be inside your team's root directory on the server. Make sure you name your home page index.html. What you name your other files doesn't matter as long as your links work.
In addition, make sure that each team member has an identical copy of the entire project folder. Each student should name that folder redesign and upload it to their individual space on the server, inside the GD50 directory.
Documentation
As a group, create your documentation page in the same way that you did for the UX project. It should include the following
- Screenshots of the old website and your new redesign
- Link to final website
- Link to style guide
- Card sorting data (embedded)
- Wireframe (embedded or as images)
- Moodboard
Name the file documentation.html and save a copy into the final website's folder, as well as in each person's copy of that folder on the server.
Project Overview
For this final project, you will be working in groups to redesign a website for a local non-profit organization. These websites need a lot of help, not just aesthetically. You will be going through all the processes of design and development that you have learned up until this point — beginning with card sorting researching and ending with a finished product. The goal of this project is you not only practice your skills, but familiarize yourself with the web design process as a collaborative effort.
Deliverables
Phase 1
- Card Sorting Data (export from OptimalSort)
Phase 2
- Wireframes
- Moodboard
- Style Guide
Phase 3
- Overview Statement
- Full Documentation
- Final Website
Phase 1: Research
Step 1: Choose a Site
Visit the websites listed below to preview their content and design.
Now use this link to choose which site you would like to work on. You will asked for a first choice and a second choice. I will use the results to form your teams.
Design Teams — 11am class
| Feral Paws user: paws1 | Feral Paws user: paws2 | Feral Paws user: paws3 | Feral Paws user: paws4 | Bully Rescue user: bully1 | Bully Rescue user: bully2 | Centro de folklor user: centro |
|---|---|---|---|---|---|---|
| Terry | McKenna | Raymond | Vang | Jennah | Thai | Eliana |
| Yadid | Jeff | Kaysean | Luis | Brianna | Sandra | Valeria |
| Marcos | Olga | Kathy | Geovanna | Keelia |
Design Teams — 3pm class
| Bully Rescue user: bully3 |
Feral Paws user: paws5 |
Arte Américas user: arte |
Historic Fresno user: historic |
|---|---|---|---|
| Albert | Jason | Kathleen | Cody |
| Chris | Konnor | Eduardo | Nate |
| Gianna | Sayo | Michaela |
Group FTP Accounts
Logging into your group FTP accounts is very similar to accessing your individual accounts, except that you have a different username and password.
HOST: home737596390.1and1-data.host
USER: u93586494-your team's username
PSWD: RGBa255!
Refer to the FTP Instructions in the Resources section for review.
Step 2: Inventory
As a group, thoroughly go through the site you will be redesigning. Talk about the different people who would use this site and what their needs and interests are. Create an inventory of the site by listing all of the content you find, even things that might not be in the navigation. Make a list of all the different tasks a person can do or would want to do at this site. This list will become your cards for the card sorting.
Step 3: Card Sorting and Analysis
Using the techniques you learned in class and from the Lynda playlist, set up and conduct a card sorting experiment. You may use physical cards or ux testing software such as Optimal Sort. Conduct the test on a minimum of five people. Make sure you have the final data saved in some sort of spreadsheet (if using physical cards) or online.
Deliverables
You will be responsible for providing documentation for the following...
- Card Sorting Data (export from OptimalSort)
- I.A. Diagram
Phase 2: Design
The web design process is not a linear process. Every project requires a different workflow and the different stages benefit from the insight of other stages and task. Although the work described below is presented in a certain order, that doesn't mean that your team's workflow has to follow that order. It's important that you discover your own iterative process.
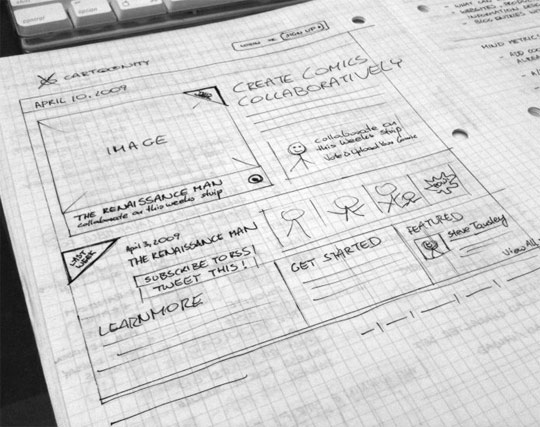
Wireframes
When you begin the process of designing a website, a good first step is to create a set of website mockups to communicate the structure, user interface, and overall "look and feel" of the site. These mockups are simply images we create that show what the website will look like without needing to dive straight into coding. These mockups are just flat images that cannot be interacted with, but look like a screenshot of a website page. We use these mockups as a way to communicate design ideas back and forth with our clients and also as a “blueprint” to develop the website once design is approved.
Your team will create three wireframes — one for each of the pages of your website.Create at least two mockups of your website. Make sure your wireframes contains all the elements that will be on the site. Your final website will be build based on this "blueprint."
These wireframes can be sketched on paper or created in Adobe Xd.
Example wireframe sketch
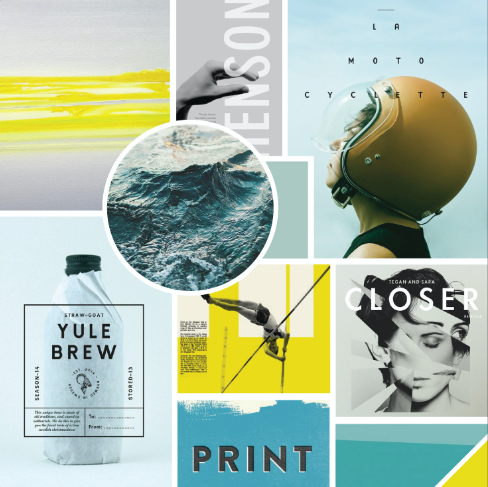
Moodboard
A Mood Board is a collection of images that are tied together by a particular theme, keyword, or concept. Think of this as a collage, like an interior design would gather photos and swatches to convey the mood of the space they are creating. In addition to photos, you can include color palettes, typography, and textures.
Start by gathering as many inspiring images as you can find. Then filter them down to those that seem best suited for the project you are working on. Organize them visually and play with different combinations and compositions. Be sure to include a color palette and typography inspiration.
Check out a Google image search to see lots of moodboard examples.
Example moodboards

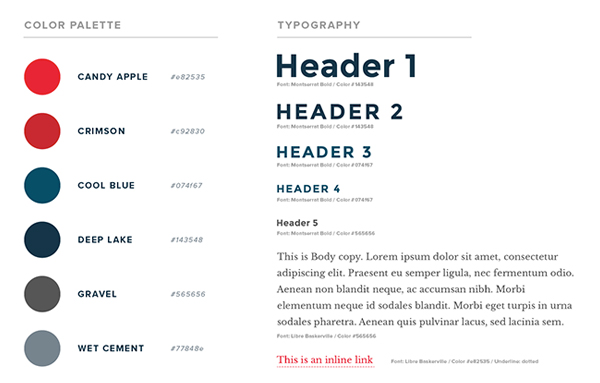
Style Guide
Style Guides are a design deliverable consisting of fonts, colors and interface elements that communicate the essence of a visual brand for the web.
Create an HTML style guide that presents and documents the typography, colors, imagery, buttons, and other elements that will appear throughout the site.
Here are a couple examples of how your page should be structured.
Duolingo
Vue Design System
Example style guide
Deliverables
You will be responsible for including the following in your documentation.
- Link to final website
- Link to style guide
- Card sorting data (embedded)
- Wireframe (embedded or as images)
- Moodboard
Phase 3: Development
This is the phase where you actually build the website in HTML and CSS.
Project: Information Architecture and Navigation Design
Due 11/6
BananaCom Website Navigation
For this project, you will go through the process of building a successful website navigation system for the fictitious BananaCom company. During the process you will conduct information architecture research, test the usability, and ultimately build a wireframe prototype. You will not be doing the visual design of the websites interface. The goal of this project is to introduce you to the principles of UX design and teach the importance of building a solid navigation structure through research and testing.
Phase 1: Card Sorting Research
In class we learned how to organize a card sorting experiment. For review, watch this Lynda playlist.
In groups of three or four, conduct the experiment on at least five people outside of the classroom. I gave each group a set of cards and a moderator script in class.
Input you data into a spreadsheet as described in the video.
Phase 2: Analyze the Data
Using the spreadsheet data, begin organizing the results into likely categories and map out a hierarchy of sections and pages that will be the information architecture for the site. Use the Lynda videos as your guide. Document the hierarchy and naming system with a tree diagram.
In class Thurs 10/25
- input and analyze card sorting data
- build IA structure/hierarchy
- prepare reverse sorting exercise
Do by Tues 10/30
- conduct reverse card sorting
- watch XD playlist
Phase 3: Reverse Card Sorting
Use the I.A. that you built to prepare a reverse card sorting experiment. Like the first one, conduct it on five people outside of class and input the data into a spreadsheet. Analyze the data and revise the I.A. accordingly.
In class Tues 10/30
- input and analyze reverse card sorting data
- revise IA based on data
- build wireframe prototype
Do by Thurs 11/1
- finish wireframe prototype
Phase 4: Wireframe Prototype
Using Adobe UX as a prototyping tool, create an interactive wireframe that demonstrates all aspects of the website's navigation system. Be prepared for final usability testing in class.
In class Thurs 11/1
- test wireframe prototype
- final tweaks
- prepare documentation
Do by Tues 11/6
- project prototype & documentation due
Final Documentation
At the end of the project, your team will submit an HTML page that documents all phases of the project. It will contain...
- Team Members' Names
- Overview of Project
- Card Sorting Research
- Raw Data (spreadsheet)
- Notes From Testing
- Diagram of Information Architecture — 1st Draft
- Reverse Card Sorting Research
- Raw Data (spreadsheet)
- Notes From Testing
- Diagram of Information Architecture — 2nd Draft
- Wireframe Prototype
- Final Notes
When the document is final, make sure that each team member has an indentical copy of the project folder. Each person should name their folder info-architecture and upload it onto their GD50 directory on the server. Make sure
that your documentation page is named index.html.
# 11
Due 10/16
UX Design: Videos + Quiz
- Watch the following two Lynda playlists
- User Experience duration: 28 minutes
- Information Architecture duration: 27 minutes
- Take this quiz.
Due 10/16
Final Fansite
Save your project into a folder named fansite and upload it into your GD50 directory on the server. Don't forget to name your home page index.html
# 9
Due 10/2
Fansite Mockups
Upload your fansite mockup images here.
# 8
Due 10/2
Trivia Site
Create a three-page trivia quiz website. Don't worry, it only has to have one question with two possible answers (i.e. yes or no).
You will need to create the following pages and link them.
index.htmlThis page should have your trivia question plus two buttons — one for each possible answer, linking to the corresponding page.correct.htmlThis is the page that appears when the user chooses the correct answer. It should have a back button which returns to the index page.incorrect.htmlThis is the page that appears when the user chooses the wrong answer. It should have a back button which returns to the index page.styles.cssUse this to give all the pages a consistent design by changing the font and styling the links to look like buttons. Make sure all of your html pages are linked to this stylesheet.
Save your pages in a folder called trivia and upload it to your GD50 folder on the server.
# 7
Due 9/27
Fansite: Gather Content
For the next project, you will be creating a 3-page fansite.
A fansite is a website created and maintained by a fan or devotee about a celebrity, thing, or particular cultural phenomenon. Fansites may offer specialized information on the subject (e.g., episode listings, biographies, storyline plots), pictures taken from various sources, the latest news related to their subject, media downloads, links to other, similar fansites and the chance to talk to other fans via discussion boards.
— Wikipedia
Your fansite can be about anything you choose. Here are some possible categories:
- musician or musical genre
- sports team or athlete
- author or specific book
- design/artist/performing artist
- film or television series
- video game
- social or artistic movement
- specific objects
- specific type of plant or animal
- meteorlogical phenomenon
- historical event
- etc...
Your final website will include the following three pages. (You are welcome to add more sections.)
-
home page
should have some sort of introduction/description - listing page
presents a series of pieces of information, such as a discography/filmography (musician/actor), timeline (social movement or someone's life), varieties (plants...), characters or storyline (book or video game), etc... - photo gallery
For Thursday you should have chosen your topic and gathered all the content for the first two pages.
# 6
Due 9/27
Using Images on the Web
Now that you know how to organize files and link them in your html with specific file path names, you are able to include more media assets into your pages, such as images.
For Thursday, do the following...- Watch these two videos about web graphics file formats and how to resize and compress them in Photoshop.
- Watch my screencast, where I go through the process of creating the page you will be creating.
- Create a webpage that displays three photos that have have been sized equally and appropriately. See the screen shot below for an example. Name your html file
index.html, save it into a folder namedhw6-1. Place your images inside a folder namedimgs. You can name your image files however you like, as long as the file path names are correct in the html. Upload the folder into yourGD50directory on the server.

# 5
9/18
Final Type Specimen
due at the beginning of class
# 4
9/11
CSS Grid Practice
- Complete the CSS Grid Garden game and the Codecademy tutorial.
- Starting with the codepen below, add grid properties to recreate these screenshots: [1], [2], [3], [4].
- Save each one separately and place it in your GD 50 collection in codepen.
![[1]](imgs/grid1.gif)
![[2]](imgs/grid2.gif)
![[3]](imgs/grid3.gif)
![[4]](imgs/grid4.gif)
See the Pen grid exercise — start by Rusty Robison (@rustyrobison) on CodePen.
# 3
9/6
Type Specimen Project: Mockup
In typography, type specimen refers to a presentation of a certain typeface to showcase its design and/or use.
—TypeGuru.com
For this extended project, you will be creating a web version of a typeface specimen. You may use the typeface of your choice, as long as you can provide information about its history and/or designer, so be sure to do your research and select carefully.
The first part of the project is to design a mockup of the specimen, using the design tool of your choice (PS, AI...). Your design needs to contain the following elements:
- name of typeface
- examples of the characters
- examples of all fonts in the family
- at least one paragraph of body copy
- information about the typeface's history and/or designer
Your overall layout and design should evoke the spirit of the typeface and be an example of the type of design it is best suited for.
Reference
Google image search
Historical examples
Upload a jpg of your mockup here. no larger than 10MB
# 2
Due 10/4
First Stylesheet: Videos + Coding
Lynda Playlist
CSS Basics, duration: 37 minutes
After you've watched that, take this short quiz.
Terms and Conditions Styles
Fork the pen below and apply your own styles to the HTML.
See the Pen Terms & Conditions by Rusty Robison (@rustyrobison) on CodePen.
Be sure to...
- typeset the body copy with your own font and spacing
- add color using hexadecimal values
- make the "I Agree" element look like a button
- add a border to contain all the elements
Do not change the HTML.
Save it to your GD 50 collection in codepen.
# 1
Due 8/30
HTML Basics: Videos + Coding Exercises
Complete This Interactive Tutorial from Codecademy
Unit 1: Intro to HTML >> Lesson: HTML basicsCoding Exercises
Do these in codepen and save each one in your GD 50 collection in your account.
-
The List
Create a list of your choosing (i.e. grocery, to do, pet peeves, favorite baked potato toppings...). All the items should be numbered (hint: the numbering with be created automatically if you use that right tag). Give your list a heading.
-
The Letter
Compose a letter, using HTML tags as your typesetting tools. The letter should have at least two paragraphs in the body, and five of the words or phrases should be italicized. Make it fun by using some creative dummy copy.
-
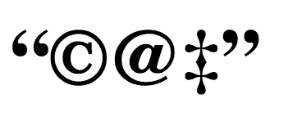
The Special Cat
Using the HTML codes for special characters, produce the "word" you see below.
HTML tags from class:
- <h1> through <h6>
- <p>
- <em>
- <strong>
- <blockquote>
- <ol>
- <ul>
- <li>
- plus, special character codes
# 0
Due 8/28
Videos: Don't Fear the Internet
Watch videos #1 and #2 from dontfeartheinternet.com.
Video 1: Not a Series of TubesVideo 2: HTML: Hamburger Text Markup Language
Codepen Accounts
Be sure to create an account at codepen.io and follow me (search for the user rustyrobison).